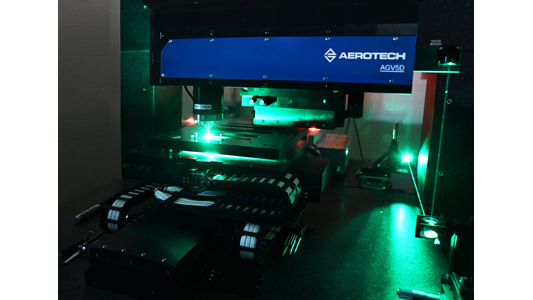
By: Bryan Germann Product Manager, Aerotech
Five-axis scan heads offer fast and flexible solutions for generating precise holes, contoured slots and other geometries with fully defined cross sections. With a suitable system, it is possible to control the entire micro-machining process – the laser, scan head and workpiece positioning – to produce macro-sized components to sub-micrometer dimensional tolerances.
This paper outlines the working principles of one such 5-axis laser precession scan head, Aerotech’s AGV5D, combined in a system with precision linear motion axes and controls. It explains the system’s working principles, including the powerful G-code based
programming approach that enables standard CAM software and built-in motion functions to perform complex hole drilling and milling operations at a micrometer scale.
5-Axis Laser Motion Systems: Working Principle
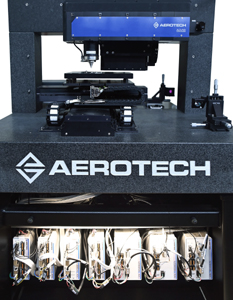
Fully understanding the advantages of using a 5-axis laser motion system for micro-drilling and milling – such as the one shown in Figure 1 – and how its accuracy is quantified in such processes – requires a sound understanding of the example system’s working principle and how it is programmed.
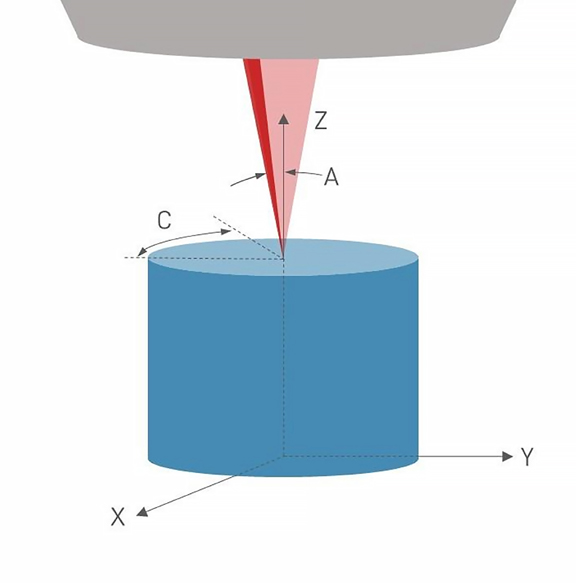
The example system referenced in this paper uses Aerotech’s AGV5D 5-axis precession scanner to manipulate a laser beam in five degrees of freedom (DOF), as shown in Figure 2:
- X and Y – Spot placement within the field of view at any Z height (2-DOF)
- Z – Spot focus control at any position (1-DOF)
- A – Beam taper angle OR tilt away from Z (1-DOF)
- C – Beam clock angle OR rotation about Z (1 -DOF)
The AGV5D scanner’s maximum operating volume is a 2 mm diameter circle (X and Y) over a height of 2 mm (Z). The beam taper angle (A) is +/- 9° with a beam clock angle (C) of 360° continuous rotation.
Functioning much like a 5-axis CNC machining center, the AGV5D leverages RS-274 compliant G-code commands to move the beam along 2D and/or 3D paths (lines and arcs). The beam exits from a hardware nozzle at the lowest point on the scan head, so the working volume where laser processing is performed extends below the tip of the nozzle. All commanded trajectories programmed for the AGV5D’s X-Y-Z-A-C axes move the focused spot within the working volume.
Beyond beam manipulation in five DOF, the system also supports additional axes commanded by the same controller and G-code commands. External X, Y and Z axes move the workpiece beneath the scanning head to extend the field of view and coordinate with beam-path motion. Because Aerotech’s Automation1 software-based machine controller (iSMC) oversees the entire system, the G-Code trajectories can be coordinated with powerful Aeroscript programming commands.
In the example system, the laser positioning motion of each AGV5D axis (X-Y-Z-A-C) comes courtesy of a 200 kHz drive, while the servo rates moving the substrate and head around (external X-Y-Z) are at 20 kHz. All drives are part of the same network, coordinated by Automation1. Thus, when generating a trajectory that controls each of the eight axes, all drives execute in real time using the same controller. This implementation is unique to the AGV5D because it uses a single controller architecture for physical servo and laser scan head motion resulting in more flexible deployment and part machining.
Flexible Programming Features
Several programming tools are available for a system like the one used in this paper’s example. Users can generate G-code from standard CAM software if they have the proper post-processor for the system’s kinematics. This could involve directly programming features in milling mode, a feature that allows users to define the cutting diameter, path and speeds to achieve a target cut quality. Figure 3 shows an example of an involute gear feature using milling mode.
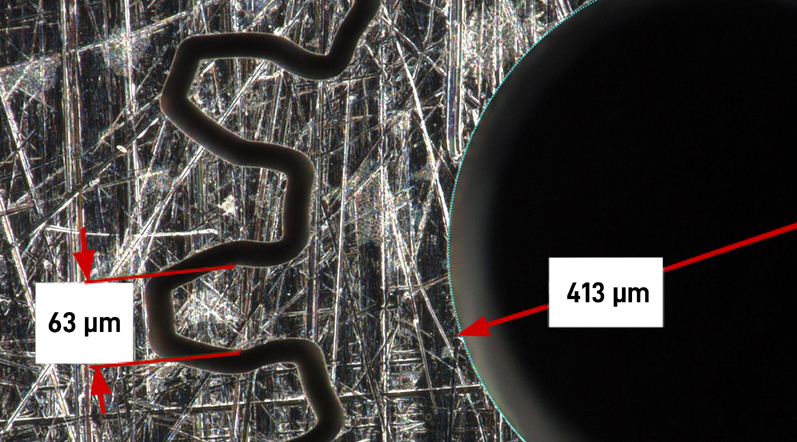
Figure 3. An involute gear profile with 63 µm wide teeth alongside a 413 µm diameter circular feature.
However, this would be tedious for common drilling profiles and shapes like circular holes. For this reason, the AGV5D can generate a wide variety of pre-canned drilling functions using parametric code blocks. There are pre-canned functions for circles, squares and filets. Below are some examples of circular and square drilling arrays with nearly vertical sidewalls where their top and bottom dimensions are within 1 micrometer of each other.
Figure 4 shows a visualization and outcome of using a pre-canned drilling function to create arrays of circular holes that meet the following criteria:
- Round holes
- Straight walls (no taper)
- 100 µm diameter
- Substrate: 320 µm thick silicon nitride
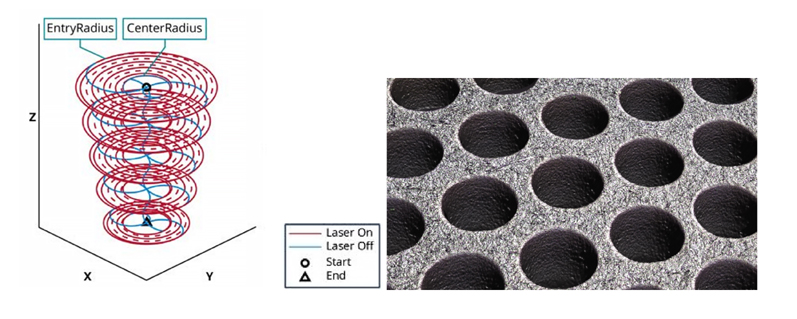
Figure 5 shows a visualization and outcome of using a pre-canned drilling function to create arrays of square holes that meet the following criteria:
- Square holes
- Straight walls (no taper)
- 100 µm diameter
- Substrate: 320 µm thick silicon nitride
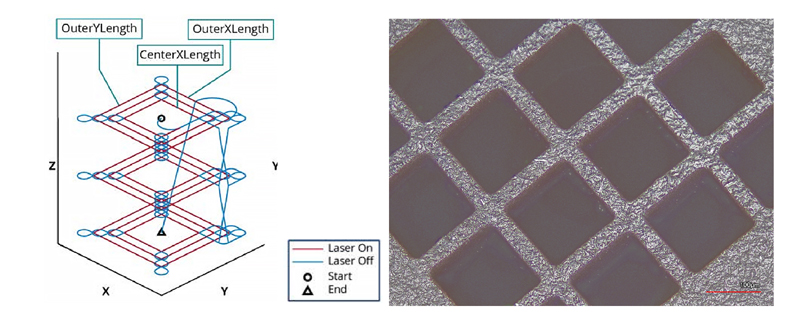
Functions are called from inside the Aeroscript program where arguments of the function can be numerical values or variables calculated in other functions. An example function for creating a unidirectional stacked cylinder drilling operation for a round hole is shown in the following code block.

Defining these parameters is akin to defining spindle speed, feed rate and depth of cut for a CNC machining center’s drilling program.
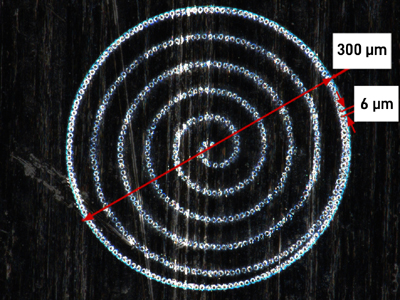
The AGV5D also leverages Position-Synchronized Output (PSO) for distance-based firing and fluence control. PSO is a powerful control feature that permits the definition of an output trigger based on the position feedback of each individual axis in the motion system. It is possible to use encoder feedback, which takes place in the MHz range, to pulse the laser at specific positions along the path. As a result, users can avoid trigger errors based on changes in velocity or acceleration, ensuring consistent spot spacing.
Because laser firing is based on distance traveled rather than the velocity or fixed frequency of laser pulses, users can control the specific amount of fluence for a specific position during micro-machining operations. Figure 6 shows an example of a 300 μm diameter spiral with a laser spot every 6 μm. PSO is used to create the equidistant firing.
Powerful Data Visualization and Process Optimization Toolkit
Automation1 is more than just a programming software tool – it is a full automation controller with data visualization and process tuning capabilities that are common in motion control platforms for servo stages. Because users can optimize parameters and run the motion on the virtual controller and with hardware physically connected to it, the example system offers keen insight (shown in Figure 7) into what is happening with the commanded motion and laser triggering.
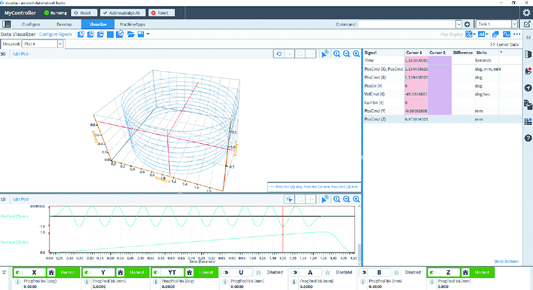
The example system uses Automation1’s data visualization in 1D, 2D and 3D, allowing users to visualize the real-time position error for process evaluation. The tool allows users the ability to plot variables like the laser spot’s position command and position error for all five degrees of freedom. During laser process development, users can see if a large amount of position error – which could visibly manifest in a process quality issue – is occurring on the planned trajectory. It is also possible to plot laser triggering along a path to assess the spot placement accuracy. This toolset allows for optimizing the process without ever needing to cut a part.
Processing Speed
The time to process any given feature depends on a variety of parameters including the laser type, laser process recipe, material, part tolerances and motion capabilities. For example, the 100 µm holes shown in Figure 4 took less than 1 second to machine with 10 passes in 320 µm thick silicon nitride. The AGV5D offers a peak trepanning frequency of 800 Hz for 100 µm holes.
However, it is important to note that the dynamic limits with any servo control system are entirely dependent on the geometry being commanded. The data
visualization features in the Automation1 control platform allow the user to optimize the trajectory while maintaining the appropriate part tolerances and processing speed.
Power Ratings and Thermal Stability
When developing processes with high-powered pulsed lasers, it is imperative to understand the impact of that laser energy on the AGV5D’s internal optical elements. The AGV5D’s optics can handle a maximum power rating of 400 µJ for both 1030-1064nm and 515-530 nm wavelengths. This energy level is aligned with many laser processes for micro-machining, enabling the AGV5D to take advantage of the high dynamic motion design and achieve higher throughput.
Because maintaining thermal stability is also important, the AGV5D has no controller or drive electronics within the scan head. This design minimizes heat transfer within the head that otherwise would lead to thermal drift. Furthermore, all motors are actively water cooled, allowing for thermal stability during long duration machining operations. The scan head also employs a positive air purge to minimize dust ingress and direct gas-fed cooling of the mirrors and optics. Overall, these standard features dramatically improve the machining repeatability over time and reproducibility from machine to machine, resulting in higher quality parts.
Application Example: Laser Micro-Milling
Using the single-layer mill function while staying at the same Z level and applying a feed rate to move the X and Y axes delivers a consistent depth of cut. The single-layer mill function has parametric values for the diameter and trepanning speed that define a certain material removal rate. The mill can be turned on and off with a simple G-code command and is parametrically defined, meaning the cut width, cutting speed, dwells and more are defined by variables. The result is flexibility when defining and performing roughing and finishing cutting profiles.
Figure 8 shows an example of a single-layer milling operation that resulted in a 200 µm wide milling path with a 10 µm depth of cut per pass on a 100 µm thick sheet of stainless steel at a feed rate of 3 mm/s. Performing 10 passes will result in the feature shown below being cut through the thickness of the sheet, resulting in perfectly vertical sidewalls and entry/exit dimensions within 1 µm of each other.
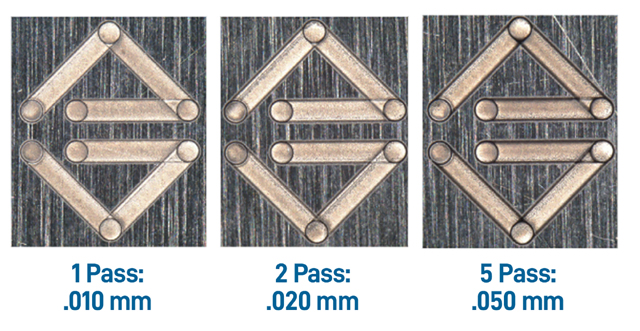
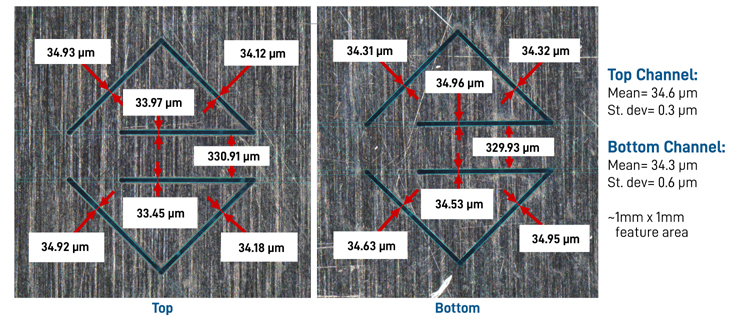
Because the milling function is flexible, changing the single-layer mill diameter has little to no effect on cut depth. Even a sizable change from 200 to 35 µm, for example, delivers the same cut depth because the trepanning operation’s laser speed is the same. Also, the overlap of the spot spacing, thanks to PSO, is the same. Figure 9 shows the full depth of cut for the 35 µm feature, resulting in top and bottom dimensions that are within 1 µm of each other over the entire 1 mm wide pattern.
Summary
Five-axis laser precession scanners are integral to laser micro-machining. They enable the creation of vertical sidewalls on high aspect ratio features, a critical capability for a range of precision applications. This technological advancement facilitates the production of
components with complex geometries and exacting tolerances, serving diverse sectors that demand unparalleled accuracy and detail.
Applications empowered by this technology include:
- Medical device manufacturing for components like cardiovascular implants and machined hypodermic tubing
- Microelectronics processing, which is crucial for creating probe cards and micro vias for high-density interconnect (HDI) substrates and printed circuit boards (PCBs)
- Automotive component manufacturing, specifically for precision parts such as fuel injector nozzles
The AGV5D system distinguishes itself through its design and programming methodology. Its architecture significantly reduces thermal drift during machining processes, a vital factor for maintaining precision over extended operations. Furthermore, the AGV5D’s compatibility with G-code programming unlocks the potential for leveraging commercially available CAM software, bridging the gap between traditional CNC machining practices and the advanced capabilities of laser micro-machining. This integration enhances the system’s flexibility and streamlines the transition for industries already familiar with CNC machining, making it a pivotal solution for high-precision manufacturing challenges.

About the Author
Aerotech Product Manager Bryan Germann focuses on laser processing products, including Aerotech’s AGV laser scan heads and associated Automation1 drives and software control features. He has hands-on experience designing and managing the production of
high-precision motion control and automation machinery and products. Germann earned his bachelor’s and master’s degrees in mechanical engineering from the University of South Carolina. He holds 17 U.S. and international patents.


